search the web

Showing posts with label breakfast. Show all posts

Saturday 9 September 2017

Wheat Rava Idlies


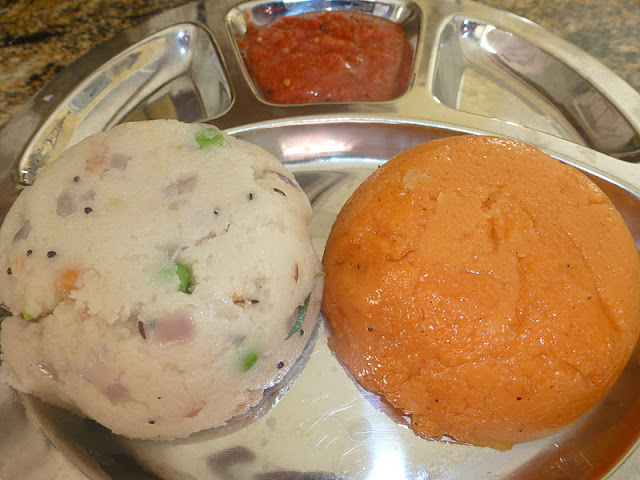
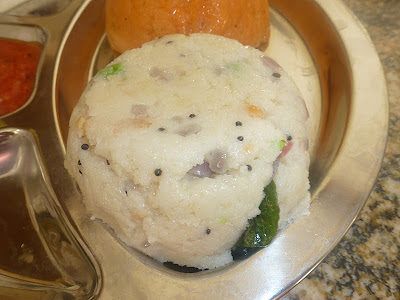
Though I am a big fan of regular Idlies, I just wanted to try the same Idli concept with wheat rava. Since few weeks, I have been planning to try this out by myself.  I substituted Idly rice ( Idly Rava ) with Wheat rava, the one that we generally use for making Uppuma. Looking at the idlies, its difficult to find out that its made out of wheat rava. As these idlies don't have any rice, I am sure that it should be a good tiffin item for diabetic people and a very healthy breakfast for all ages. With a side of good spicy chutney, these mild yellow colour idlies would definitely be added in your regular breakfast menu or dinner menu.
Ingredients
Wheat rava -  3 Cups
Urad Dal / Ulatham paruppu / Minna Pappu - 1 Cup
Fresh Coriander Leaves - 1 Handful finely shredded
Salt - To Taste
Fresh Curd - 1 / 2 Cup
For Tempering
Olive Oil - 2 tsp
Hing / Asafoetida - 1 dash
Mustard Seeds - 2 tsp
Jeera - 2 tsp
Curry Leaves - 5 or 6 crushed
Black Pepper Powder - 1 tsp
Turmeric Powder - 1 tsp
Method
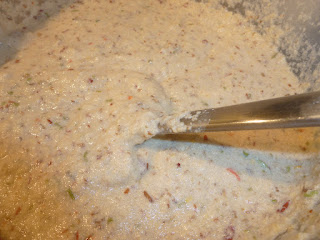
  1. Soak the wheat rava and the urad dal separately for 3-4 hours.
  2. Grind the Urad Dal to a fluffy consistency like how you grind for a normal Idly.
  3. Now mix the Urad dal batter with the wheat rava in a big container thoroughly.
  4. Add required amount of salt to the Idly Batter and keep it for fermentation.
  5. After its fermented, do tempering process with the ingredients as mentioned above with little oil and pour them over the batter.
  6. Add a handful of finely shredded coriander leaves on top of it.
  7. Add 0.5 cup of fresh curd to the Idly batter and mix very well.
  8. Now add drops of oil into the Idly Moulds and spread the oil over the Idly plates.  Pour the idly batter over the Idly moulds upto the level equally on all the moulds.
  9. Cook all the Idlies in a Idly cooker for about 10-12 minutes.
  10. Check whether the Idlies are fully cooked inside. After its cooked, allow the cooker to cool down for few minutes.
  11. Then open the Idly plates and carefully take out the Idlies from the Idly moulds one by one.
  12. Serve the Idlies with any spicy chutney.
Variations
You can add finely shredded carrot, peas to the Idly batter and serve it to kids.
You can add a cup of sour curd to the Idly batter and can make the Idlies instantly without the process of  fermentation. But from my experience, if you make these Idlies with a slightly fermented batter, the idlies are softer and have enough moist content inside and not too dry.
You can make mini idlies with this batter and give it as an evening snack to kids.

Tips
Allow the Idly batter to ferment atleast for few hours before making the idlies.
Don't grind the batter too watery. Grind the batter to the correct Idly consistency.

Multi Beans Adai / Multi Beans Crispy Dosa

Multi Beans Adai / Multi Beans Crispy Dosa

Beans Adai with a side of a cup of Blueberry Kesari and Aviyal ( Vegetable Stew in coconut gravy ).
Legumes ( Beans ) are generally referred as "poor people's meat" but i prefer to call them as "healthy people's treat".  Legumes supply more amount of  Good Protein to the body and there are many varieties of legumes found in the world which are widely used in many cuisines across the world.
One of the important health benefits of  legumes ( beans ) is its rich source of cholesterol reducing fiber. It reduces the blood sugar levels from rising too rapidly after a meal so its a best choice for diabetic people.  It also protects against breast cancer. In addition to the high fiber content, beans also contain lots of antioxidants, folic acid and other vitamins.
Another important issue that stuck in our mind is the  gas problem due to the intake of Legumes / beans. Its natural for any human digestive system to produce gas ( intestinal gas ) during regular digestion. But after consuming beans, we might feel that excessive intestinal gas getting produced. In order to minimize this excessive intestinal gas, its always suggested in many health magazines to break down the fiber in Beans by mashing, grinding..etc., Also by adding good amount of ginger into the recipe, this problem could be minimised and helps in easy digestion.

Multi beans Adai is one of the food items I tried out last week. I followed the same method of making  traditional adai but substituted legumes ( Beans ) instead of lentils ( Dals / Paruppu ).  As I mentioned, ginger is always a good accompaniment for any legume based food item. So it is a good idea to make some spicy Ginger Chutney and serve this as a side for the Adais.

Ingredients

Black Eyed beans ( White Karamani ) - 1/4 cup
Rajma - 1/4 cup
Soy Beans - 1/4 cup
White Channa Dal ( White Kondakadalai ) - 1/4 cup
Red Moth - 1/4 cup
Brown Masoor Dal - 1/4 cup
White Beans ( Lima Beans ) - 1/4 cup
Green Gram ( Pesara pappu ) - 1/4 cup
Idly Rice - 1 Handful
Ginger -  1 inch square or 3 tbsp grated
Hing - 1 Dash
Dry Red chillies - 3 or 4
Salt - To Taste
Oil - Enough to fry the Adais on the kadai / Pan.

Method
  • Soak all the Beans and rice in water for 4-5 hours. Then drain the water and grind them coarsely in a wet grinder along with ginger, dry red chillies.
  • Add required amount of salt, dash of Hing, crushed curry leaves to the Adai Batter and leave it aside for an hour.
  • Then, heat the frying pan and pour the Adai over the pan, spread them uniformly and make a round shaped Adai.
  •  Add few drops of oil along the edges of the adai. Fry them till it turns golden brown in colour on both sides.
  • Continue the process for the rest of the batter. Serve the crispy hot Beans Adai with a side of spicy Ginger Chutney and a small bowl of fresh curd.
Tips / Variations
You can add different varieties of legumes of your choice and try it out.
You can add finely grated red onion pieces into the batter and make some yummy Onion Adais too..
A Side of Aviyal is also a good choice for this Beans Adai.

Tuesday 5 September 2017

Healthy Black Eye Beans Sundal \ Lobia \ Periya Vellai Karamani Sundal

Black Eye Beans are low in calories and rich in fiber which help to control cholesterol in our body. They are low in fat, low in sodium and a good source of folate, potassium, phosphorous and manganese. When combined with grains, they supply high amount of protein and it can be consumed as an alternative to animal meat. Due to its high potassium content and low sodium, it helps to reduce blood pressure also. So, to consume this highly nutrient Black eye beans, I made this healthy sundal on one of the Navarathri days..
Ingredients
Black Eyed beans / Lobhia -- 2 Cups
Oil - 1 tbsp for tempering
Hing / Asafoetida - 1 Dash
Salt - To Taste
Mustard Seeds - 3 tsp
Urad Dal - 1 tsp
Curry Leaves - 1 Stem
Dry Red Chillies - 4 or 5
Green chillies - 1
Grated Ginger - 1 tsp
Fresh Coconut Flakes - 1/2 Cup
Method
Soak the Black Eyed Beans for an hour in warm water. Then, pressure cook the beans with enough water to cook it for 2-3 whistles.Drain the excess water from the vessel. In the Kadai, add the oil and start adding Hing, Mustard Seeds, Urad Dal, Curry leaves, Dry red chillies, green chilli and grated ginger first. When the tempering is done, then add the black eyed beans into the kadai and add enough salt and mix it thoroughly. After 2-3 minutes, add the fresh coconut flakes and switch off the flame. Mix the sundal and coconut flakes without mashing the sundal. Now the sundal is ready for Neivedhyam.
Tips / Variations
Don't overcook the beans as the sundal would become pasty.
Instead of curry leaves or if its not available, you can add fresh coriander leaves at the end for garnishing.

To make it more spicy, you can add the grounded powder of coriander seeds and dry red chillies to the sundal after tempering.

Monday 4 September 2017

Bajji Platter


Bajjis are the mostly served snacks on Jaanavasam, the day before marriage in South India. On a snowy, wintery day, it will be an ideal choice to have some hot bajjis with a side of hot tea. Though bajjis are fried snacks and made with besan flour and are highly caloric, still they are tasty and mouth watering.....Well, my daughter has been asking me to make her favourite potato bajji since few weeks....and somehow it was not working out...Finally her dream came true..I made her more potato bajjis and few..chilli bajjis for my husband too. Believe me, its really difficult to resist our feelings and we did not care so much about our calorie counts on that day.!!!!
Ingredients
Potato - 3 or 4 Medium
Green Peppers - 3 or 4.
Besan Flour / Kadalai Maavu / Senapindi - 1 cup.
Rice Flour - 3 tbsp.
Red Chilli Powder - 1 tsp
Jeera powder - 1/2 tsp
Salt - To Taste
Hing / Asafoetida - 1 Dash
Omum Seeds / Ajwain Seeds - 1 tsp
Oil - Enough to fry the Bajjis.
Method
  • Wash and peel the skin of potatoes and slice them into thin rounds and put them in a bowl of hot water with some salt.
  • Likewise, cut or slice the hot peppers as per your choice and put them into a separate bowl of hot water with little salt. I mainly did these steps to half cook the veggies inside and its easier for the kids to have them.
  • In a vessel, add the besan flour, salt, required powders and make a smooth paste enough to coat the veggies with some water. Let the paste be not too watery..
  • In a frying kadai, add some oil and heat it. When the oil gets heated up, dip the potato rounds into the bajji batter and drop them carefully into the heated oil one by one. While dropping the bajjis, reduce the flame to a low level and after dropping all the bajjis, increase the flame to a medium.
  • When the bajjis turn golden brown on both sides, take them out and drain them on a flat plate with a paper tissue on it to soak the oil coming out of the bajjis...
  • Similarly, soak the Hot peppers too into the batter and make Mirchi Bajjis and drain them out on a plate.
  • Now the bajji platter is ready to eat with a side of tea.
Tips / Variations
You can make bajjis with any kind of vegetables like Brinjal, Onions, Zucchini, Raw banana, Paneer.
You can increase the quantity of chilli powder as per your spice level.

Methi Paratha / Methi Parata / Methi Chappathi / Methi Chapati

Fenugreek leaves , methi leaves are nature's gift to mankind. Its rich in minerals like Potassium, Calcium and Iron. Fenugreek leaves have good dietary fiber and are abundant in Vitamin C and Vitamin K..They add an excellent flavour to cooking. In our small vegetable patch, we grow methi, green peppers ( capsicum ), lady's finger(okra), tomatoes, basil this year. Out of these, methi leaves grow faster and are abundant in our garden. So, I use methi leaves in most of our regular cooking at home. This time I made methi paratha, one of our favourites at home for dinner. With a side of good creamy raita, it was delicious.  There are "n" number of ersions of methi parathas and its ratio and taste would be different in every household and I am presenting you my version of methi paratha.
Ingredients
Wheat Flour - 4 cups
Fresh Methi leaves shredded or cut - 3 cups
Turmeric Powder - 2 tsp.
Garam Masala Powder - 2 tsp
Red Chilli powder - 1 tsp
Sugar - 1 tsp
Salt - To Taste
White sesame seeds - 3 tbsp.
Curd or Plain Yogurt - 1 Full cup
Ginger Garlic Paste - 1 tbsp
Green chilli paste - 2 tsp
Water - Enough to make the Dough.
Oil - For frying the Methi parathas.
Method
  • Wash and cut the methi leaves thoroughly. Cover it with a lid and cook the leaves in the microwave for few minutes to make them softer. Keep it ready.
  • On a big basin or bowl, add all the ingredients for making the dough and add water little by little.
  • Make a thick dough like poori dough and add little oil in the middle of dough preparation. Knead the dough properly in order to get good methi parathas.
  • Keep the dough for few hours. When you are ready to eat, heat the tawa / pan to medium.
  • Using a roti maker or using manual methods, make a medium size round parathas and keep them ready.
  • When the pan is ready, cook the methi parathas one by one uniformly on both sides with little oil on its side.
  • Store them in a round shaped container and enjoy the hot methi parathas with a side of raita , mango chunde or tomato pachidi / pickle of your choice.
  • Methi parathas can be stored for even 4-5 days and eat and its an ideal choice for travel too...
Tips
You can make methi pooris with the leftover methi paratha dough and it tastes very good. My kids loved the methi pooris very much.
Try to make the paratha dough atleast 3-4 hours before cooking the parathas.

Sunday 3 September 2017

Healthy Multigrain Bread Puttu


Since few days, I have been thinking of making something different with the big loaf of Multigrain bread remaining in the bread basket. Really bored of the regular Bread Jam, Bread Peanut butter, Bread with Nutella. Though I heard of this bread puttu from one of my friends, I never get a chance either to make it  or taste it before. I followed the regular procedure for making this puttu without a traditional puttu maker. It came out decently and it could be served with some uppuma ( with rava, semiya ) as a combo for breakfast. It will definitely be an ideal and healthy breakfast for kids. Preparation time for this puttu is also very less...So, don't get scared with the second loaf of any bread variety which you buy from the wholesale stores ( like Costco, BJs)...The second loaf can easily be consumed by making this variety too....
Ingredients
Multigrain Bread - 1 full loaf
Ghee - 2 tbsp
Cardamom Powder - 2 tsp
Cashew Nuts - 2 tbsp
Fresh Coconut flakes - 1/2 a cup
Sugar - Between 1/4 to 3/4th of a cup ( depending upon the sweetness of the bread )
Method
  • Grind the remaining loaf of the Multigrain bread in a mixer grinder.
  • Mix the bread puttu powder with the fresh coconut flakes and steam them together in a vessel for 5 -10 minutes. As I don't have the puttu maker, I steamed them by keeping the puttu vessel inside a big kadai and covered the kadai with the lid. After its steam cooked completely, keep the steamed puttu ready.
  • On medium heat, add ghee into the kadai. When its heated, add the cashew nuts and fry them for few minutes till they get golden brown.
  • Add the steamed puttu mix to the kadai.
  • Add the cardamom powder and sugar to the puttu now.
  • Mix them all well for few minutes and switch off the flame.
  • Now the healthy puttu is ready with rich taste and good flavour.
Tips
Any variety of excess bread loaf can be converted into puttu form.!!! Though its a healthy option, multigrain puttu variety would be little heavy, so its difficult to eat more quantity whereas the wheat bread puttu is softer and can be eaten easily by kids.

Friday 1 September 2017

Plain Medhu Vadai / Urad Dal Vadai

Plain Medhu Vadai / Urad Dal Vadai

Medhu Vadai, the soft spongy and crispy rounds are always special and great to enjoy them during tiffin time, great prasadam during festival time and perfect on any occasions. I made this medhu vadai on several occasions but everytime failed to take pictures as they would disappear quickly from the serving plate. That's the main reason for the delay in posting this recipe. There are so many varieties of Vadai we could make using the same batter. I would append those varieties whenever I make in future.. These vadas can be an excellent breakfast treat with a side of cocnut chutney and sambar too....
Ingredients
Urad Dal / Minna Pappu / Ulutham Paruppu - 2 Cups
Rice Flour - 1 tbsp
Salt - To Taste
Curry Leaves - 7 or 8 crushed
Hing / Asafoetida - 1 Dash
Method
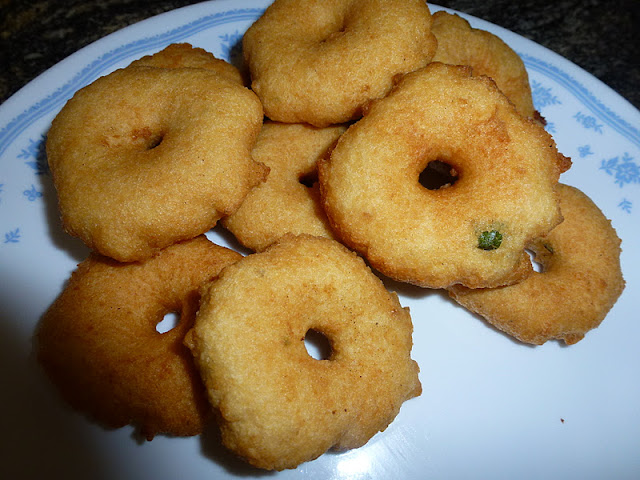
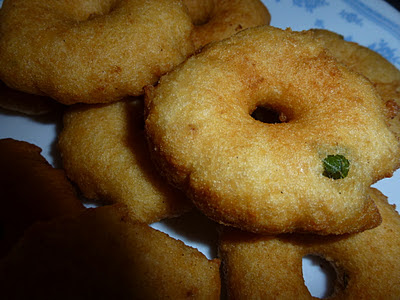
Soak the Urad Dal in warm water for 1-2 hours. Grind them in a wet grinder by sprinkling very little water while grinding. Do not pour more water while grinding. Try to get a fluffy batter and keep it aside. If you are using a mixie, then try to use the whipper for grinding which gives a very fluffy batter.(In my experience). To that batter, add all the other ingredients and make a small round shape with a hole in the middle ( like a mini donut ). Drop them carefully into the heated oil in the pan. Fry them on both sides till golden colour and keep doing the same for the rest of the batter. Now the golden crispy vadais are ready for Neivedhyam.

Chow Chow Bath / Kesari Kichidi Combo

Chow Chow Bath / Kesari Kichidi Combo

"Chow Chow Bath"  was first introduced to me in Bangalore. I never heard of this combo before. Initially I said no to that combo as I was unsure about its taste and ingredients. After I knew that its a combo of Rava / pineapple kesari and Rava Upma / Sooji Upma, I was quite happy and it became one of my favourites.  Whenever I go to any Darshinis, I mostly order this combo as its so yummy with a mixed taste of both sweet and salt. Kesari, a delicious mouth watering sweet always remind me of the Marriage Tiffin time and takes me to that occasion all the time. Though we all make Upma regularly, once a while we can make this combo to make the Breakfast time more special. Kids will definitely love this combo as its colourful and yummy. This recipe is dedicated to my dear daughter who loves this combo very much.
Rava Kesari :


Ingredients
Rava / Sooji - 1 Cup
Sugar - 1 Cup ( Adjust according to your taste ) 
Water - 2.5 cups to 3 cups
Ghee - 3 tbsp
Cashewnuts - 12 - 15 cashews
Cardamoms - 3 or 4
Kesar Food Colour - 1 pinch ( For colouring )
Method
  • In a heavy bottomed frying pan, heat little ghee and roast the cashews till golden brown and keep it aside.
  • In the same pan, add the rava/sooji and dry roast them with little ghee on a low flame. Stir constantly till it turns golden brown.
  • When you get a nice aroma, add water and a pinch of kesar food colour to the roasted rava and after its cooked to desired level, add sugar to the rava and allow them to cook for few minutes.
  • When it slowly comes to a pudding consistency, add the crushed cardamom powder, roasted cashews and remaining ghee and stir them thoroughly for another 3 minutes.
  • Transfer them to the serving bowl and enjoy.
Sooji Upma / Rava Upma / Rava Bath / Rava Kichidi 
This is the simpler version of rava upma which i always include while making this combo. Though we make different versions of Rava kichidi for breakfast, this goes well with a spicy chutney on its side.  I will post different versions in the following posts. 

Ingredients
Rava / Sooji - 1 Cup
Oil - 2 tbsp
Hing/Asafoetida - 1 Dash
Mustard Seeds - 2 tsp
Jeera / Cumin Seeds - 1 tsp
Urad Dal / Minna Pappu / Ulutham Paruppu - 2 tsp
Channa Dal / Senaga Pappu / Kadalai Paruppu - 2 tsp
Green chillies - 3 ( slice it or cut into small pieces )
Crushed Ginger - 2 tsp
Curry Leaves - 1 stem
Peas - 1 handful
Red Onion - 1/2 cut into small pieces.
Method
  • In a heavy bottomed frying pan ( preferably Non-stick), dry roast the sooji/rava till it turns golden brown. Stir constantly so that it does not turn black. Transfer them to a plate and keep it ready.
  • In the same pan, add oil first. When it gets heated, add the mustard seeds, cumin seeds, Hing, urad dal, channa dal. When its roasted, add the cut/sliced green chillies, ginger, curry leaves and red onion. Fry them for about 3 - 4 minutes. Add the frozen peas to the contents and fry them for another minute.
  • Add 3 cups of water and required amount of salt to the pan. Cover the pan and allow them to boil for 3-4 minutes. While its boiling, reduce the flame and slowly add the rava/sooji into the water. Stir continuously while adding in order to avoid lumps in the upma. After adding the rava/sooji, mix all the contents uniformly and cover the lid till the sooji/rava gets cooked. Remove the lid and add a tsp of ghee into the upma and serve this with a side of spicy chutney. 

Thursday 31 August 2017

HOW TO MAKE Adai - Protein Rich Lentils Dosa


Adai is one of the traditional South Indian tiffin which is mostly served with Aviyal in restaurants. This is made with a mixture of different Lentils and there are many varieties of Adai like Carrot Adai, Cabbage Adai, Coconut Adai, Drumstick Leaves Adai, Onion Adai, etc., based on the vegetable we add to the Lentils Mix. Now, I am blogging about the regular Adai with some onions in it. I try to make this often for breakfast as its a rich high protein breakfast for kids. With a side of fresh curd, Adai is definitely an ideal wholesome breakfast.
I used the Lentils like Moong Dal ( Green Gram ), Thuvar Dal ( Split Red Gram ) and Channa ( Chickpea / Bengal Gram ) in my Adai along with some Idly Rice.
Upon looking at the nutritional benefits of Lentils, they are having highest level of protein, contain dietary fiber, folate and other vitamins. Sprouted Lentils also contain sufficient levels of all amino acids and they are a good source of Iron.
Ingredients
Channa Dal / BengalGram - 1 Cup
Moong Dal / Green Gram - 1/4 Cup
Thuvar Dal / Split Red Gram - 1/2 Cup
Idly Rice - 1/2 Cup
Hing / Asafoetida - 1 Dash
Dry Red Chillies - 3 
Red Onion shredded - 1/2 cup
Curry Leaves - 7 to 8.
Salt - To Taste
Oil - To fry the Adais.

Method :

Making the Adai Batter :
Soak all the Lentils and Idly rice in a same container with water for 2-3 hours. Drain the water and grind it using a mixer grinder with Hing and Dry red chillies. Add some water into the coarse paste and make it little thicker but not like thin dosa batter. Add required amount of salt and crushed curry leaves to the Batter and keep it ready. After 2 or 3 hours, start making the Adais as they taste better after you leave the batter for sometime. But it should not be kept for fermentation.
Making the Adai on the Stove :
Heat the frying pan on the stove on medium heat. Using a red onion, spread little bit of oil onto the frying pan/tawa and make the surface uniform and smooth before pouring the batter. When its sizzling hot, reduce the flame and pour one round of batter into the center and slowly extend it and make a big round like below.  Apply oil along the sides of the Adai and in the middle. Fry the Adai on medium heat on both sides.
Continue the same process for the rest of the Adais and serve the crispy thin adais with a side of thick fresh curd and ginger pickle. 


Tips / Variations:
While frying the Adais, turn it to the other side of frying only after the first is fried to slight golden brown and crispy.
Add drops of oil in the middle of the Adais instead of pouring more oil on its sides.
Try to serve with a side of good Aviyal if you are making this on special occasions.

Wednesday 30 August 2017

HOW TO MAKE Paneer Veggie Roti RECIPE

Paneer Veggie Roti

HOW TO MAKE Paneer Veggie Roti RECIPE

Wanted to give chappathi / Roti to my son with good protein and vegetables. Same way, we wanted to have spicy Capsicum Paneer Fry ( which he cannot have at his age), I decided to make his chappathi loaded with paneer and veggies instead.  So I transformed the normal chappathi / Roti by mixing few cubes of fresh paneer, grated carrots, peas, little omum powder, jeera powder. We were so satisfied that he also had some good healthy meal along with us. Because of  fresh paneer, the rotis came out softly and it was colourful with different veggies too.

Ingredients
Chappathi / Roti Dough - Tennis Ball Size
Grated Carrots - 1/4 cup
Frozen Peas ( cooked )- 1 Handful
Fresh Paneer Cubes - 2 Cubes medium size
Jeera Powder - 1 pinch
Omum / Ajwain powder - 1 pinch
Ghee - For frying the chappathi / Roti

Method
  1. Take the chappathi dough which you prepare for making regular chappathis / Rotis.
  2. To that, add grated carrots, cooked peas, fresh paneer cubes, jeera powder, Omum powder and crush everything and mix it thoroughly with the dough.
  3. Make a small chappathi / Roti into a round shape and fry it on medium flame both sides with little ghee.
  4. Serve it with fresh curd. Healthy evening snack or morning breakfast for the kids who refuse to eat veggies separately sometime.
Tips
Avoid mashed potatos in this dough as it does not go well with paneer and makes it too heavy.