search the web

Showing posts with label Curry Varieties. Show all posts

Monday, 18 September 2017

how to make Cheppankizhangu Fry / Cheppankizhangu Varuval / Chamadhumpa fry / Colocasia Fry / Taro Root Fry / Chamadumpa Fry

Cheppankizhangu Fry / Cheppankizhangu Varuval / Chamadhumpa fry / Colocasia Fry / Taro Root Fry / Chamadumpa Fry


Start with, I am giving my version of Cheppankizhangu Fry ( Taro Root / Colocasia Fry ).  Though I love this fry, somehow I was not a big fan of that sticky kozha kozha Cheppankizhangu Fry. To avoid that stickiness, I tried a different method to make the curry more delicious and presentable. My family loved this version and the appreciations at home made me to present this to you all in my blog confidently. This fry is definitely going to be an excellent side curry during any occasions. Instead of having our regular Potato fry, try to substitute this yummy Cheppankizhangu Fry in your menu and see the difference. Your comments and suggestions are always welcome to improvise this dish and also my blog.

Ingredients

Cheppankizhangu -  15 to 18
Oil - 2 tbsp
Hing - 1 Dash
Mustard Seeds - 2 tsp
Urad Dal / Ulutham Paruppu - 2 tsp
Curry Leaves - 1 Stem
Turmeric Powder - 1 tsp
Red Chilli Powder - 3 tsp
Sambar Powder - 1/2 tbsp
Coriander Powder - 1 tsp
Salt - As required
Rice Flour - 1/2 tbsp

Method

  • Peel the skin of the Cheppankizhangu and cut them into mini rounds or any shapes you desire. Generally the mini rounds would get fried uniformly and are best suited.
  • In the frying pan, add the oil and heat it on medium flame. When its heated, add hing, mustard seeds, urad dal and curry leaves in order and when the tempering process is done, add the mini rounds of Cheppankizhangu into the kadai carefully.
  • Add the turmeric powder alone first into the kadai and add little water ( about 1/2 a glass ).
  • Allow the cheppankizhangus to cook on low flame for nearly 10 minutes. Stir it in the middle and add little more water if required while cooking. When its cooked three fourth, add required amount of salt into the kadai / pan.
  • When the cheppankizhangus are completely cooked to your satisfaction, add the other powders and little more oil into the pan.
  • Coat the cheppankizhangu rounds with all these powders on all sides and allow them to get fried uniformly on medium flame. Flip the rounds carefully during this process.
  • When they turn golden brown, switch off the flame. Let the curry remain in the pan till you actually serve.

Saturday, 16 September 2017

Cauliflower Curry / Cauliflower Poriyal - Type 2

Cauliflower Curry / Cauliflower Poriyal - Type 2


This version of Cauliflower curry is spicy and its similar to the ones served in a vegetarian thali in restaurants.  This spicy curry / poriyal is a good choice to be considered on any special meal.
Ingredients
Cauliflower - 1 medium
Red Onion - 1 Small or 1/2 medium
Tomato - 1 Big
Grated Ginger - 2 tsp
Crushed Garlic Paste - 3 tsp
Finely cut Green Chilli pieces - 1 tsp
Oil - 1 tbsp
Hing/Asafoetida - 1 Dash
Mustard Seeds / 2 tsp
Sombu / Fennel Seeds - 1 tsp
Urad Dal - 2 tsp
Channa Dal - 1 tsp
Curry Leaves - 5 or 6
Coriander leaves - To Garnish
Turmeric Powder - 2 tsp
Red Chilli Powder - 3 tsp
Coriander Powder - 1 tsp
Salt - To Taste
Method
  1. Wash and Clean the Cauliflower florets thoroughly and keep them aside.
  2. In the cooking pan, add oil first. Finish the tempering process by adding Hing, Mustard Seeds, Sombu, Urad Dal, Channa Dal, Curry Leaves first.
  3. When its done, add the Garlic Paste, crushed ginger, onion into the Pan. Fry them till the raw smell vanishes off completely.
  4. Add the tomato pieces into the pan and allow them to cook for a minute with the lid closed.
  5. Mash them when its done and finally add the cauliflower florets into the kadai.
  6. Add the turmeric powder to the florets and allow them to cook for few minutes with the lid closed on a medium flame.
  7. When the florets are cooked enough, add all the powders and required amount of salt into the pan and mix them well.
  8. Fry the contents of the pan uniformly on all sides for another 4-5 minutes.
  9. Switch off the flame and garnish with coriander leaves and serve.
Tips / Variations
  1. You can microwave the cauliflower florets and add them into the pan to fasten the cooking process.
  2. You can customize the spicy powder quantity according to your taste buds.
  3. You can omit the Garlic, Ginger ingredients too while making this curry if you don't want to.

Friday, 15 September 2017

Kathirikai Kalyana Curry / Brinjal fry / Vankaya Fry

Kathirikai Kalyana Curry / Brinjal fry / Vankaya Fry


Brinjal ( Kathirikai/Vankaya) is one of the special vegetables and is mostly made on special occasions in a very delicious way. I like this special type of Brinjal fry which is served in marriages mainly in "Maapillai Azhaippu".

Ingredients
Brinjal - 12 ( Small or Medium size)
Turmeric Powder - 1 tsp
Asafoetida - 1 tsp
Salt - 1 tbsp ( Enough to taste).
For grinding
Channa Dal ( Kadalai Paruppu / Senaga Pappu) - 4 tbsp
Coriander Seeds - 3 tbsp
Red Chillies - 5 or 6 ( Medium ).
Coconut Shredded - 2 tbsp.
For tadka
Mustard Seeds - 2 tsp
Jeera - 1 tsp
Urad dal - 2 tsp
Curry Leaves - 1 bunch ( 7 or 8 ).
Method
1. Wash the brinjals and cut each brinjal into 4 halves and put it in a bowl of water.
2. On the stove, put the oil and add the ingredients one by one for tadka.
3. Then, add the brinjal on the oil and fry for 1-2 minutes.
4. Add the turmeric powder and salt to the brinjal.
5. Add little water and cook the brinjals till its cooked nicely. Make sure that the brinjals do not become too soft or mashy.
6. Meantime, grind the powder and keep it ready.
7. To the cooked brinjal, add the grinded powder and fry the curry for 5-6 minutes.
8. This brinjal curry serves as a good side dish with rice, chappathi.
Variations
You can add some chilly powder separately if you want to have more spicyness ( karam) in the curry. But I prefer to have the karam in moderation so that the curry shows all the tastes and flavours equally.

Pavakkai Fry - BitterGourd Fry

Pavakkai Fry - BitterGourd Fry


Bitter Tasting "Pavakai"/ "Bitter Gourd" are not liked by many people due to its bitter taste. But looking at the nutrient side, its highly recommended and good for diabetic people. Bitter Gourd is very low in calories and has twice the amount of Calcium, Potassium,beta-carotene found in Spinach, Banana and Broccoli respectively. I generally include this vegetable in my regular cooking at least once a week. And we could make this in different forms like Pavakai Pitlay, Pavakkai Fry, Stuffed pavakai, Pavakai Sambar,Pavakkai Vethalkuzhambu etc., Of all, I love to make Pavakkai Curry with a little sweet, tangy, bitter and spicy taste. Small round pavakkais are best suited for making this variety. As I don't get that often in my place, I tried to make this curry using a bigger Pavakai. Its a good combo with Mor Kuzhambu.
Ingredients
Fresh Bitter Gourd - 4 or 5 cut into tiny pieces 
Thick Tamarind juice - 2 tbsp
Jaggery grated - 1 to 2 tbsp
Red Chili Powder - 3 to 4 tsp
Turmeric Powder - 1 tsp
Hing/Asafoetida - 1 Dash
Salt - To Taste
Oil - 2 tbsp
Mustard Seeds - 2 tsp
Urad Dal/ Minna Pappu/ Ulutham Paruppu - 1 tsp
Curry Leaves - 1 stem

Method
  • Wash the Bitter Gourd and cut them as shown in the picture.
  • Microwave the Pavakai along with the tamarind extract and very little water in the Microwave oven.
  • In the frying pan, add oil first. When its heated, add the Mustard Seeds, Urad Dal, curry leaves. When they get roasted to golden brown, reduce the flame to complete low and add the cooked Pavakai pieces.
  • Add the turmeric powder, jaggery, salt, red chili powder and mix them well.
  • Allow them to cook with a lid on for another 2-3 minutes.
  • Open the lid and fry them on medium flame till the size of the Pavakai pieces get reduced to some extent.
  • Switch off the flame and enjoy this with hot rice.

Thursday, 14 September 2017

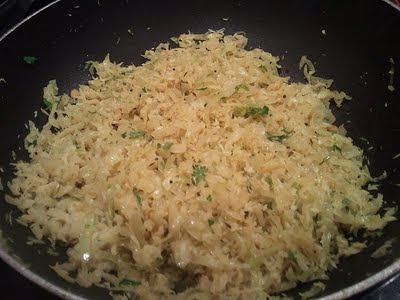
Cabbage Poriyal / Cabbage Fry

Cabbage Poriyal / Cabbage Fry


Cabbage being an excellent source of Vitamin C, is also a low calorie food. Also, cabbage is highly recommended for slowing down growing cancer cells.

Many people does not show interest in this curry. They even show their disappointment if its included during any special meal or parties. But if
the curry is made with good care, it can be made more attractive and tastier
too.

Ingredients
Cabbage - 4 cups nicely cut into thin slices.
Shredded coconut - 1/4 cup.
Mustard seeds - 2 tsp.
Jeera - 1 tsp
Urad dhal - 1/2 tbsp
Channa Dhal - 1/2 tbsp
Curry leaves - 4 or 5.
Coriander leaves - 1 tbsp.
Turmeric Powder - 1/2 tsp.
Salt - To taste.
Green chilli Paste - 1 tsp.
Ginger - 1/2 tsp ( nicely grated)
Olive Oil - 1 tbsp.
Asafoetida / Hing - 1/2 tsp

Method
1. Cut the cabbage into thin slices or in any shape you desire.
2. Wash and drain the cut cabbage and keep it separately.
3. On the kadai, add olive oil and heat it. Add asafoetida/hing, mustard seeds, jeera into the heated oil.
4. When it sputter, add urad dal, channa dal, green chilli paste, curry leaves ( if you have) to the oil.
5. After sauting for a minute, add some turmeric powder into the oil itself.
6. Finally add the cabbage into the kadai. Mix it thoroughly and sprinkle some water into the kadai and close it.
7. Let the veggie mix cook for 3-4 minutes on a low flame.
8. Sprinkle some more water in the middle if its not fully cooked. But dont overcook cabbage, dont make it mashy like a halwa. This will ruin the taste and texture of the cabbage curry.
9. Add salt and grated ginger at the end and mix it. Let it remain in the stove for another minute.
10. Open the lid and see if you are able to see the cabbage slices separately. If so, then add the shredded coconut to the veggie mix and (As curry leaves are rare here, i added coriander leaves to the curry.)
12. Now the cabbage curry is ready to be served in a meal.

Variations
You can add fresh peas or grated carrots to the curry for better taste, for better colour. It will make it look richer on special occasions.

Wednesday, 13 September 2017

Murungai keerai Paruppu Usiliyal ( Drumstick Leaves Dal Fry )

Murungai keerai Paruppu Usiliyal ( Drumstick Leaves Dal Fry )


Murungai Keerai ( Drumstick Leaves ) is a significant source of  beta-carotene, Vitamin C, protein, iron and Potassium. Its widely used in the Siddha Medicine in India. So, a combination of this rich drumstick leaves and high protein dals ( Paruppu) will be one healthy side in a meal.
Looking at these drumstick leaves in one of the Indian groceries in California, i decided to buy more and try out different dishes here at home. First I tried the "Murungai Keerai Paruppu Usiliyal" , a recipe from my Mom.
Ingredients
Drumstick Leaves  -  1 Big Bunch. ( Leaves would come for 4-5 cups fully ).
Toor Dal ( Thuvaram Paruppu / Kandhi Pappu ) -  1/2 cup
Moong Dal (  Payatham Paruppu / Pesara Pappu ) - 1/3 cup
Channa Dal - 2 tbsp
Urad Dal - 2 tbsp
Red Chillies Dry - 5 Medium Size
Hing ( Asafoetida ) - 2 tsp
Olive Oil - 4-5 tbsp.
Salt - To Taste.
Turmeric Powder - 2 tsp.

For tempering
Mustard Seeds - 1 tbsp
Jeera - 1 tbsp
Urad Dal - 2 tsp
Curry Leaves - 7-8 ( if you have )
Red Chilly Dry - 1 Medium

Method
  1. Soak the Dals ( all paruppu/pappu) in water for 40 mts first. After 40 mts, drain all the water from the dal. Grind it with red chillies , little hing , very little water to make it pasty.  Keep the paste aside.
  2. Remove the drumstick leaves from the stem carefully. Wash the leaves and cook it in the microwave for 3-4 minutes till its cooked.
  3. On medium heat, add oil first. When its heated , start adding the ingredients for tempering one by one.
  4. First add the grinded dal mixture into the kadai. Mix it in the tempered oil slowly.
  5. Add 2 tsp of turmeric powder and some salt into the dal mixture now.
  6. Stir the dal mixture from top to bottom for 1-2 minute and close the lid. Let it cook on medium heat for few minutes.
  7. During this process, keep stirring the dal mixture so that it does not stick to the bottom of the kadai. Generally due to steam it wont stick to the bottom.
  8. When you feel that the dal mixture is cooked three fourth, add the cooked drumstick leaves into it. Mix the leaves and paruppu mixture thoroughly.
  9. Add some more salt and close the lid for 3-4 minutes on medium heat.
  10. Then, keep the lid open and fry for few more minutes ( 5-6 minutes ). Keep stirring the mixture constantly and patiently.
  11. Switch off the heat when you feel that the veg-dal mixture is cooked and slightly fried. You can make out easily as the leaves and the dals become separate and wont be that pasty. It will look like a sundal.
Variations
You can also steam the Dal Mixture ( Grinded Paruppu Mixture ) in Idli cooker and add it while making the vegetable. In this way, the dish will get done quickly and also with less oil, less effort. But today i wanted to try it in this way.
You can choose the Paruppu / Pappu / Dals in the Usiliyal Mixture. We always try to avoid having more channa dal in this mixture.

Tips
You can add some red chilly powder if you feel that the usili is not spicy enough.
You can steam the Dal Mixture instead of slowly cooking the Dal Mixture in the kadai itself.

Tuesday, 12 September 2017

Spicy Paneer Capsicum Fry

Spicy Paneer Capsicum Fry

Need to make a quick side dish for my rotis, need to make a special paneer dish for my guests, need to avoid grinding for the gravy.....Go for Capsicum Panner Fry.!! A simplest, tastiest, quickest, healthy side dish for the Rotis.
Ingredients
Green Capsicum -  6 Medium Size
Onion - 1 Big
Tomato - 1 Medium
Paneer  -  16 oz cut into square cubes.
Jeera - 2 tsp.
Turmeric Powder - 1 tbsp
Red Chilly Powder  - 1 tbsp
Garam Masala Powder - 2 tbsp
Coriander Powder - 1 tbsp
Salt - 1 tbsp
Sugar - a small pinch
Coriander Leaves - To garnish
Olive Oil - 3 tbsp

Method
  1. Wash the capsicum, tomato and cut into thin slices. Cut Onion also into thin slices.
  2. Cut the fresh panner into small squares and keep it separately.
  3. Add 2 tbsp of Olive oil into the kadai. When its heated, add jeera seeds into it.
  4. Add slices onions first into the kadai. Add a pinch of salt into it while frying the onions. Fry for a minute.
  5. Add sliced green capsicum pieces into the kadai. Cover the lid and cook it for 1-2 minutes. DONT ADD any water into the kadai at any stage.  Then open the lid and fry the capsicum and onion for another 5-6 minutes on medium flame.
  6. Add a pinch of sugar and 1 tbsp of salt into the kadai.
  7. Add all the powders into the veggie mix in the kadai. Mix everything thoroughly.
  8. Then, add the paneer cubes into the kadai. Add the remaining 1 tbsp of Oil into the kadai.
  9. Fry the contents on a medium flame. Carefully mix the contents till the capsicum gets cooked and fried nicely and paneer cubes get toasted slightly. Make sure that the paneer pieces do not break into pieces. Carefully stir the contents in the kadai.
  10. Finally add the sliced tomatoes and mix it once again. Cover the lid of the kadai for just 2 minutes enough for the tomato slices to get cooked. Main purpose of tomatoes is to add some tangy taste to the dish.
  11. Open the lid and keep it on medium flame for 2 minutes. Mix everything once again and switch off the heat. Garnish with coriander leaves.
  12. Capsicum Paneer Sidedish is now ready to serve with Rotis.
Variations
If  "Red Capsicum" is available, try to add 1 red capsicum in this curry.  As red capsicum has some slight tangy, sweet, spicy flavour in it, it nicely enhances the taste of this paneer dish.

Tips
Good quality fresh paneer and fresh capsicum decides the taste of this dish.

Mixed Vegetable Fry

Mixed Vegetable Fry

Having few leftover veggies not enough to make a complete curry. No worries. I had 2 brinjals, 2 potatoes, 3 or 4 drumsticks and only one tomato. I decided to make a simple, mixed vegetable fry which played as a good side dish with rasam rice for us.

Ingredients
Brinjals - 2 big size cut into small cubes
Potatoes - 2 Medium Size cut into small cubes
Drumsticks - 3 or 4 cut into small finger size
Onion - 1 medium size
Tomato - 1 medium size
Frozen Peas ( cooked ) - 1 handful
Curry Leaves - 1 stem ( if you have )
coriander leaves - 1 handful
Asafoetida / Hing - 1 pinch
Mustard seeds - 2 tsp
Jeera  - 1 tsp
Red chilly dry - 1 medium size
Urad Dal / Ulutham Paruppu / Mina Pappu - 1 tsp
Turmeric Powder - 1 tsp
Red Chilli Powder - 1 tbsp ( Depends on your taste )
Sambar Powder - 1/2 tbsp
Salt - To taste
Sugar - a small pinch
Olive Oil - 2 tbsp

Method
  1. Wash the vegetables and cut those into small cubes and keep them aside. Cut the tomatoes and onions too and keep them aside.
  2. Add oil first into the kadai on medium flame. When it gets heated, add mustard seeds, jeera, red chilly dry, urad dal, asafoetida, curry leaves for tempering.
  3. When its done, then add onions and fry it little bit with a pinch of salt. Add turmeric powder to it now.
  4. Then, add cut brinjals, potatoes to the kadai and fry for a minute. Then, cover the kadai with a lid and cook the brinjals, potatoes for 4-5 minutes on medium flame with little water.
  5. Separately cook the drumsticks in the microwave for 3-4 minutes and keep it ready.
  6. When the brinjals and potatoes get cooked, add the cooked drumsticks, peas into the kadai.
  7. Add all the powders as mentioned in 'Ingredients' into it. Also add remaining salt and a pinch of sugar at this stage.
  8. Mix everything thoroughly in the kadai and let it cook openly for 3 - 4 minutes. In the middle, stir the mixture.
  9. After few minutes, when all the vegetables get cooked and fried to your satisfaction, switch off the heat.
  10. Garnish with coriander leaves and serve. An excellent dish with any rice variety.

Kale Paneer

Kale Paneer

Kale, a dark green leafy vegetable is known for its powerful antioxidant properties. Kale is very high in Vitamin K, Vitamin C, beta carotene and rich in calcium too. Its highly recommended to steam, microwave or stir-fry Kale leaves instead of boiling them. Because boiling tends to decrease the levels of anti-cancer compounds in them. I also tried to steam the Kale leaves while making this "Kale Paneer" side dish. Mostly I ended up making "Kale Poriyal" or "Kale Pappu" whenever i bought fresh Kale leaves before. This time, I decided to make something totally different and mainly to attract my kids. Its easier with a help of Paneer. Substituted Kale instead of Palak, this healthy Kale Paneer is very unique and tastes mostly like "Saag Paneer". So, you can boldly make this Kale Paneer and serve with your softer rotis / chappathis to your kids. My daughter liked it very much and even told me to remember how I made this dish.!!!!
Ingredients
Olive Oil - 3 tbsp
Butter - 1 tbsp
Jeera - 2 tsp
Ginger Garlic Paste - 1.5 tbsp
Turmeric Powder - 2 tsp
Coriander Powder / Dhaniya Powder - 1/2  tbsp
Red Chilly Powder - 2 tsp
Garam masala powder - 1 tbsp
Sugar - 1 pinch
Salt - To Taste
Fresh Paneer Cubes - 16 oz cut into small squares or 20 square pieces in medium size

For Grinding
Kale Leaves - 1 Bunch
Coriander Stems - 1 cup ( preserved in the fridge for grinding purpose)
Ripe Tomato - 2 Medium Size
Onion - 1/2 Small one
Green Chillies - 2 Big Ones
Jeera - 2 tsp

Method
  1. Wash the Kale leaves, tomato and cut them into small pieces. Cut the half onion too and keep it ready.
  2. On Medium heat in the big kadai, add 2 tsp of Olive Oil. When it gets heated, add jeera, onion pieces,green chillies and saute them for a minute with a small pinch of salt.
  3. Add tomatoes next and saute them for another 1-2 minutes till the tomatoes get mashed and slightly cooked.
  4. Finally add all the Kale leaves and coriander stems into the Kadai and close it with the lid. Let the veggie cooks with the steam only inside. Make sure that the flame is not on High...
  5. After 4-5 minutes, open the lid and check to see whether the Kale leaves reduced in size and get cooked. If its not cooked fully, sprinkle some water into the kadai and cover again with the lid.
  6. Allow the Kale leaves to get steam cooked thoroughly. After its completely cooked, transfer the contents into a flat vessel or plate for cooling.
  7. Meantime, shallow fry the paneer cubes in a separate kadai and keep the Paneer cubes ready too.
  8. After the Kale mixture gets cooled, grind them in a mixer grinder to a fine paste.
  9. Let the grounded Kale mix cools down.
  10. In the same kadai, add 3 tbsp of Olive Oil. When it gets heated, add jeera seeds and ginger garlic paste to the oil.
  11. Fry them nicely till the raw smell of ginger garlic paste goes off.
  12. Then, add turmeric powder, corainder powder, dry red chilly powder, garam masala powder and fry them for a minute.
  13. Then, add the grounded Kale mixture into the kadai. Add required amount of salt and a pinch of sugar too to the mix in the kadai.
  14. Mix them well once and cover the lid of the kadai.
  15. Let them cook with the steam inside. In the middle, open the lid and stir the Kale mix and cover again.
  16. Continue the process for 5-6 minutes till you are satisfied with the texture of the kale mix and its consistency.
  17. Finally add the shallow fried paneer cubes into the kale mix and stir again.
  18. Cover the lid again and let them steam cook for another 2-3 minutes.
  19. Switch off the flame and allow the Kale Paneer to settle down for sometime.
  20. Then serve this highly nutritous side dish with your softer rotis / Chappathis.
Tips
If you dont like the slight bitter taste of the kale leaves, add half cup of spinach / palak leaves and reduce the quantity of kale leaves in the grounded mixture.
Add little cream on the top of the Kale Paneer just before serving. This is just to make it look attractive in parties. Otherwise, keep the spicy taste of the "Kale Paneer" as it is.

Monday, 11 September 2017

Avarakai Tomato Fry / Broad Beans Tomato Fry / Chikkudukaya Tomato fry

Avarakai Tomato Fry / Broad Beans Tomato Fry / Chikkudukaya Tomato fry


Avaraikai / Chikkudukaya / Broad beans can be made as Poriyal, Kootu, can be added in aviyal too, made as a simple fry too. This time I just made a simple fry with some tangy tomato flavour in it. Instead of having only the broad beans in the fry, I just added a full ripe tomato to have some tangy flavour in the fry which makes it more tastier. This goes well with hot rasam rice or any dal rice varieties...But it tastes really good only if its made with fresh broad beans. Sometime we forget the freshly bought broad beans from shops and it might be hiding in the fridge somewhere. With those old broad beans, the taste of the fry is somewhat ok....but not as we expect. So, as soon as we bring those fresh ones, try to make this curry to enjoy its freshness..
Ingredients
Broad Beans / Avaraikkai / Chikkudukaya - 2 cups broken into small pieces by hands itself
Big ripe tomato - 1
Salt - To Taste
Sugar - 1 Pinch
Red Chilli Powder - 2 tsp
Turmeric Powder - 1 tsp
For Tempering
Olive Oil - 2 tbsp
Hing / Asafoetida - 1 Dash
Mustard Seeds - 2 tsp
Jeera - 1 tsp
Urad Dal / Ullutham Paruppu / Mina Pappu - 1 tsp
Channa Dal / kadalai paruppu / Senaga Pappu - 1 tsp
Dry Red Chillies - 2 medium ones
Curry Leaves - 5 or 6
Method
  1. Wash the Avaraikkai / Broad Beans / Chikkudukaya and break them into finger size using hand only.
  2. Cut the tomato into small pieces and keep them ready.
  3. On the kadai, add heat and complete the tempering process by adding all the ingredients in order.
  4. After tempering is done, add the tomatoes, turmeric powder and fry them for 2 minutes till they become mashy.
  5. Add the washed, broken pieces of Broad Beans into the kadai and a pinch of sugar into it. Mix well.
  6. Add little water into the vessel, cover it with a lid and allow them to cook inside for 3-4 minutes.
  7. After the broad beans are cooked perfectly, open the lid, add required amount of salt,red chilli powder and fry them on medium heat for 3-4 minutes.
  8. Switch off the flame after they are nicely cooked and fried. Serve this with hot rasam rice.
Variations
Cooking time of this vegetable depends on the freshness and age of this vegetable. If the Broad Beans are tender and fresh, it cooks very fast and it definitely takes more time for aged broad beans.

Sunday, 10 September 2017

Kovakkai Curry / Tindora Fry / Dondakaya Fry

Kovakkai Curry / Tindora Fry / Dondakaya Fry

Kovakkai / Tindora / Donadakaya vegetable has good medicinal values and rich in beta carotene. Its good for diabetic patients as it regulates the blood sugar level. I made tindora fry with Brinjal, drumstick sambar for dinner yesterday. Mostly, this fry would get over fast and wont have any left over. Cutting this tindora would be a debate topic whenever I make this tindora fry. One person would like to see the round shaped fried tindora and the other one would like to have finger shaped fried tindora. Finally the cutting process would be decided by Mommy's mood and time factor. Yesterday, finger shaped fried tindora won the debate, of course.
Ingredients
Fresh Tindora / Kovakkai / Dondakaya -  25-30 pieces
Turmeric Powder - 2 tsp
Red Chilli Powder - 2 tsp
Sambar Powder - 2 tsp
Salt - Enough to taste
Sugar -- 1 Pinch
For Tempering
Olive Oil - 2 tbsp
Hing / Asafoetida - 1 Dash
Mustard Seeds - 2 tsp
Jeera - 2 tsp
Urad Dal / Ullutham Paruppu / Minna Pappu - 1/2 tbsp
Curry Leaves - 5 or 6 ( if you have )
Dry Red Chillies - 3 or 4  
Method
  1. Wash all the tindora thoroughly and drain the water. Keep the tindora aside for drying.
  2. After its dried, cut the tindora into thin slices lengthwise.
  3. On a thick bottomed kadai, add oil. When it gets heated, add all ingredients for tempering as mentioned above in order. Make sure that the heat is on medium flame and the items on the kadai don't turn black.
  4. After tempering is done, add the cut tindora slices into the kadai. Add a pinch of sugar, turmeric powder into the kadai and little water too. Close the lid and allow the vegetable to cook inside.
  5. After 4-5 minutes, check to see if its cooked fully. If cooked, then add the red chilli powder, sambar powder, required amount of salt and mix them well.
  6. Let the vegetable gets cooked and fried openly on low flame for another 6-7 minutes.
  7. On low flame, the tindora fry would be done automatically after few minutes and you could see the fried thin slices of tindora.
  8. Now the tindora fry is ready to be served in a meal.
Tips
Try to make this fry as soon as you get this vegetable from the store. Does not taste good with aged and soggy tindora.
Don't add more water while cooking. Actually very little water is enough for cooking  tindora. If you add more water, the fry would turn into a regular soggy curry!!!
Variations
You can add grounded powders to make this tindora fry spicy, make it richer in a special meal. You can add grounded mix of coriander seeds, dry red chilli powder, little coconut flakes, channa dal ( kadalai paruppu / Senaga Pappu ) into the vegetable and fry them..It tastes so good.

Gobi Fry / Cauliflower Fry - For Roti and Chappathi


Gobi Fry / Cauliflower fry is a simple, quickest and tastiest fry for chappathis/rotis. Generally I make this gobi fry along with some dal varieties for chappathis / rotis. Crunchy florets coated with spices and a slight tangy taste of tomatoes make this a nice accompaniment to hot rotis. Upon looking at the nutrition, cauliflower is very low in fat, high in dietary fiber, folate, water, Vitamin C, contains several chemicals that are beneficial to human health. High Intake of Cauliflower reduces the risk of prostate cancer. Its recommended to steam, microwave or stir-fry the cauliflower and boiling is not at all recommended as it reduces the anticancer compounds in it.
Some people don't like the smell of cauliflower at all...May be with the spices and powders, if they try this Gobi fry, they might start liking the cauliflower slowly..
Ingredients
Fresh Gobi / Cauliflower - 1 Big One
Shredded red onion - 1/2 cup
Diced tomatoes - 1/2 cup
Olive Oil - 1.5 tbsp
Jeera - 1 tbsp
Turmeric Powder - 1 tsp
Red Chilly Powder - 2 tsp
Garam Masala Powder - 1/2 tbsp
Coriander Cumin Powder - 2 tsp 
Salt - To Taste
Method
  1. From the cauliflower, take out the small florets slowly. Wash all the small florets with luke warm water thoroughly.
  2. Drain the water and allow them to get dried for few seconds.
  3. On a thick bottomed kadai, add Olive Oil first. When it gets heated add the Jeera seeds followed by red onion and tomato pieces. Fry them till the red onion turns golden brown and tomato gets mushy.
  4. Then add the washed cauliflower florets into the kadai directly without any water. Sprinkle some water if the florets are too dry and to assist uniform cooking.
  5. Add the turmeric powder into the kadai. Mix them well and close the lid.
  6. Allow the cauliflower to get steamed and cooked inside with its own water content. 
  7. But keep the flame on low heat. After 4 minutes, the florets would have been cooked very well.
  8. Open the lid and add the other powders, salt and fry them on low heat till the florets get coated, fried nicely..
  9. Size of the small florets could get reduced little bit when they are fried finally.
  10. Switch  of the flame and garnish the fry with coriander leaves and serve...
Tips
If you don't overcook the florets, then the fry would be little crunchy, tasty. 

Friday, 8 September 2017

Beans Paruppu Usiliyal


Though I already mentioned the process of making Paruppu Usili with Drumstick leaves earlier, I again make this post for Beans paruppu Usili. The main difference here is that I used very less oil ( about 1 tbsp ) for the entire process and steamed the Dal mixture ( Paruppu mixture ) which makes it more healthy and also fastens the process of making.
Method


  1. Steam the fresh cut beans with little salt and a pinch of sugar and keep it aside.
  2. Grind the soaked dals ( Toor dal, Channa Dal, Moong Dal ) with a dash of Hing \ Asafoetida and 5-6 dry red chillies with some water.
  3. Steam cook the grounded mixture in Idly pans like regular idlies. Then, grind the steamed Dal Idlies in a mixer grinder few rounds to get a coarse Dal mixture ( like a Dal Puttu ).
  4. Then, add the ingredients for tempering in a pan followed by the coarse dal mixture, steamed beans and required amount of salt.
  5. Mix them well and let the usiliyal cook for about two minutes. Then, switch off the heat.
  6. Its ready to be eaten with rice.

Sunday, 3 September 2017

Vankaya Ulli Karam / Brinjals in Spicy Onion Gravy / Brinjal Masala

Vankaya Ulli Karam is my mother-in-laws recipe and we all liked the dish very much. So I decided to share her recipe with my blog friends. This brinjal dish is an excellent choice for parties along with a side of Jeera Rice / Pulav. Even with rotis or plain rice, this tastes much better. The major factor which decides the taste of the dish is the age and size of the brinjals and its freshness..If  you have very fresh small brinjals, don't keep them in the fridge and postpone the preparation.Try to make the Vankaya Ulli Karam as fresh as possible.
Ingredients
Fresh small brinjals - 12 to 15.
Onion - 1 Big
Turmeric Powder - 2 tsp
Salt - To Taste
Sugar - 1/2 tsp
For Tempering
Oil - 3 tbsp
Hing / Asafoetida - 1 Dash
Mustard Seeds - 3 tsp
Jeera / Cumin Seeds - 1 tsp
Curry Leaves - 2 stems
For the Paste
Dry Red Chillies - 8
Groundnuts - 1 handful
Coriander Seeds - 2 tbsp
Urad Dal / Ulutham paruppu / Mina Pappu - 1 tbsp
Channa Dal / Kadalai paruppu / Senaga pappu - 2 tbsp
Methi seeds / Vendhayam / Fenugreek Seeds - 1/2 tsp
Jeera / Cumin Seeds - 1 tsp
Black pepper - 1 tsp
Dry Coconut Powder - 3/4th of tbsp
White Sesame Seeds - 2 tbsp
Tamarind - 1 pinch
Onion - 1 Big one shredded

Ingredients for the Gravy
Method
  • Wash the Brinjals and make 4 or 6 slits from its bottom without breaking the brinjal in the middle. Let it looks like an umbrella with different slits and a handle at its top.
  • Cut the brinjals in a similar way and put them in a bowl of water. Cut the onion into pieces and keep it ready for the gravy.
  • Meantime, with few drops of oil, fry all the ingredients required for the gravy except onion pieces till you get a nice aroma. Then, transfer them to a mixer grinder. In the same pan, fry the cut onions and add them to the mixer grinder. Grind everything together to a fine smooth paste with little bit of water. Keep the gravy paste ready.
  • Meantime, in the vessel add oil for tempering. Add Hing, mustard seeds, jeera and curry leaves first.
  • Then, add the cut brinjals into the kadai / vessel. Add 2 tsp of turmeric powder and cook them with little water and salt. Cover the vessel and let the brinjals cook inside.
  • When the brinjals get cooked three fourth, add the gravy paste from the mixer grinder into the vessel.
  • Wash the mixer grinder with some water and pour all the gravy water into the vessel.
  • Add required amount of salt and 1/2 tsp of sugar and mix the brinjals with the Gravy carefully making sure that the brinjals don't get mashed too much. Try to keep the brinjals in full shape inside the gravy.
  • Let everything cook completely and the oil would ooze out of the dish slowly which indicates that the vankaya ulli karam is done perfectly.
Tips
Fry the spices till you get a nice aroma before grinding them for the gravy. This makes the gravy tastier.
Avoid making this dish with green brinjals or long fatty big brinjals. Try to make with small violet brinjals only to enjoy the heavenly taste of the masala.

Saturday, 2 September 2017

Dondakaya Masala / Kovakkai Masala / Tindora Masala

Dondakaya Masala / Kovakkai Masala / Tindora Masala


Kovakai / Dondakaya / Tindora / Ivy Gourd vegetable is widely used in Indian Cuisine. We prefer to make a simple fry using this vegetable as its a good accompaniment in any meal. But I tried to give a twist with an idea given by my friend and made a gravy " Kovakai Masala". It goes well with both chappathis/ rotis and rice. My dear blogger friends, try this masala once during parties or during the get-together in our regular party menu and I am sure you will elated with the appreciations.!!!
Ingredients
Kovakkai / Dondakaya - 15 to 20 fresh.
Salt - To Taste
Sugar - 1 Pinch
Turmeric Powder - 2 tsp
Oil - 1 tbsp
For Tempering
Hing / Asafoetida - 1 Dash
Mustard Seeds - 2 tsp
Urad Dal / Ulutham Paruppu - 2 tsp
Curry Leaves - 1 stick
For the Gravy Paste
Cashew Nuts - 6 or 7 full
Khus Khus - 2 tsp
Dry Red Chillies - 5 or 6
Coconut flakes - 2 tsp
Ellu / Sesame Seeds - 2 tsp
Groundnuts / Peanuts - Around 10 full
Method
  1. Wash the Ivy Gourd thoroughly and slit them lengthwise and keep them ready.
  2. In a frying pan / kadai, dry roast all the ingredients for making the gravy paste. Transfer them into a mixer grinder and grind them into a thick gravy paste.
  3. In the same pan, add oil first. When its heated, finish the tempering process by adding all the ingredients.
  4. Then, add the cut Tindora into the kadai and fry them for 2 minutes.
  5. Add the turmeric powder and a pinch of sugar and sprinkle some water for the vegetable to get cooked. Cover the pan with a lid and allow the vegetable to get cooked three fourth and not fully.
  6. When its done to that level, add required amount of salt and the grounded paste. Pour some water to the pan if its too thick and not in gravy consistency.
  7. Mix the contents completely and allow them to cook for 5-6 minutes. Stir the masala in the middle to make sure that its not turning black at the bottom.
  8. Cook for few more minutes and switch off the flame after you get the desired gravy consistency. Raw smell of the paste should be off completely and you would notice the oil getting visible on top of the gravy which indicates the completion point.
  9. Switch off the flame and transfer the Ivy Gourd Masala into a serving bowl.
  10. Enjoy this yummy Masala with your favourite rotis/ chappathis or white rice.
Tips / Variations
  1. You can add some red chili powder if the gravy spiciness is not enough.
  2. Don't overcook the vegetable in the beginning stage itself. 

Friday, 1 September 2017

Vegetable Makhanwala


Having different veggies in a limited quantity, I opted to make a complete veggie side dish for the chappathis\rotis. Vegetable Makhanwala was the best choice I felt for the night...Different kinds of vegetables in a mild spicy, creamy gravy on the side of hot chappathis will always be an ideal dinner. With the addition of few small paneer cubes along with the veggies makes it so so.... special for my kids to finish the meal. Preparation time is also considerably less for this dish. I don't prefer to use the cream while making the gravy or adding cream to the dish at the end. Instead I try to make a rich, creamy gravy using some almonds itself.
Ingredients
Beans - 10 or 12.
Carrots - 1 Big
Peas - 1 Handful
Potato  - 1 Big
Mushroom - 6 to 8.
Noolkol \ Kohlrabi - 1
Fresh Paneer Cubes - 1 Cup.
Oil - 2 tbsp
Red Chilli Powder - 1 tsp
Garam masala powder -- 2 tsp
Turmeric Powder - 1 tsp
Kasoori Methi -- 2 tsp
Salt - To Taste
Sugar -- 1\2 tsp
Milk - 2 tbsp
Ginger Garlic Paste - 1 tbsp
Cumin Seeds \ Jeera - 2 tsp
For Grinding
Onion -- 1 Big
Green Chillies -- 1
Almonds - 1 Handful
Cardamom - 1 or 2
Method
  • Wash and cut all the vegetables into small cubes and keep them ready.
  • Shallow fry the paneer cubes and keep it ready.
  • Grind together Onion, green chilli, almonds and cardamom and make a smooth paste and keep it ready.
  • Now add oil into the vessel or kadai and when its heated up, add the cumin seeds first. Then add Ginger Garlic paste to the oil and fry them till the raw smell goes off.
  • Add the grounded paste into the kadai and fry them for 2-3 minutes.
  • Then add all the powders, Kasoori methi to the gravy and fry them all for few more minutes till the raw smell completely goes off.
  • Add all the fine cut vegetables into the kadai and mix them well. Add some water to the gravy and cook everything in the kadai with the lid closed for few minutes till the vegetables are cooked.
  • Finally add milk, salt and sugar to the kadai and cook them again for few minutes. After its done, add all the fried paneer cubes into the kadai and mix them well.
  • Switch off the flame and garnish the Vegetable Makhanwala with few coriander leaves.

Tips \ Variations
Add some fresh cream at the end or while making the gravy to make it richer, especially when you are making this dish for a party or special occasion.
Also, you can substitute Almonds with Cashews if you have abundant cashews and not worried about using more cashews.

Beetroot MorKootu \ Beetroot in Coconut Yogurt Gravy


Beetroot, a deep red rooted vegetable can be eaten either in cooked form or raw, shredded in salads. This mild sweetish vegetable is an excellent source of antioxidants and nutrients. Juice of this vegetable helps in lowering the blood pressure and its useful for preventing cardiovascular problems.  Beetroot curry is the most common version made out of this vegetable. My mom used to make "Beetroot Morkootu" at home during my childhood. The gravy is made out of fresh coconut, green chillies, ginger, thick fresh yogurt and cumin seeds. Mild sweeter beetroots in the spicy, yogurt gravy is really delicious as it has varieties of taste inside.
Ingredients
Beetroot - 2 Medium
Oil -- 1 tbsp
Hing \ Asafoetida -- 1 Dash
Mustard Seeds -- 2 tsp
Urad Dal \ Mina Pappu \ Ulutham Paruppu - 1 tsp
Dry Red Chilli --- 1
Curry Leaves -- 1 stem
Fresh Shredded coconut -- Half cup
Green chillies -- 2
Cumin Seeds -- 1 tsp
Ginger - 1 tsp shredded
Fresh curd --- Half a cup
Salt - To Taste
Method
  • Peel the skin off the Beetroot and cut them into small cubes or in any desired shape. Cook them in a vessel with little water.
  • Grind a fine smooth paste of  fresh coconut flakes, green chillies, cumin seeds, ginger in a mixer grinder. Add little curd to the grinder while grinding. Keep the grounded paste ready on the side.
  • After the beetroot is completely cooked, add the grounded paste from the grinder to the vessel and mix them well.
  • Add required amount of salt to the vessel and allow them to cook for few minutes.
  • Add the remaining fresh curd into the kootu now. Mix them well again.
  • In a separate tadka \ tempering pan, add little oil followed by Mustard seeds, urad dal, red chilli, curry leaves and pour them over the Kootu. Now the Beetroot MorKootu is ready to be eaten.
  • Its good to eat with Dal Rice, Vathakuzhambu rice or any tangy rice.